Friday, 26 September 2014

Friday Favorites


Raise your hand if one of you favorite childhood toys was a big cardboard box! 

Isn't it so funny to think about? The classic tale wherein the parents buy the kids some huge and expensive gift, and while Dad is busy assembling the giant beast of a toy, the kids drag the empty cardboard box out to the driveway and create the best lemonade stand ever!
It's funny because it's true.

I love the endless possibilities of a cardboard box. And another thing I love?? … anything house shaped or house themed. 


These Cardboard Brownstones are so perfect! The tall, narrow shape makes them so sophisticated and urban. It's amazing to see how basic cardboard comes to life with the addition of some brightly colored duct tape! I can't get over how fun these are.


They are one of the super fun projects in the new book "Playful" by Merrilee Liddiard of Mer Mag. I simply cannot wait to see this book in person!


I have been meaning to share these adorable toast plates with you for a while now. I just adore their sweet little faces. Seriously…the instant I look at this plate, I want toast! 


This bag is the perfect balance of cute, quirky and classic. It has the quilted styling and chain strap of a Chanel bag, but in the form of a soft serve cone. I love that. I also love the black accent details. To me, black is a very necessary compliment to your sweet pastels. You can find it over at ModCloth.


 I am loving these little 4 x 4 Instagram albums from We R Memory Keepers. I ordered the gold and aqua. I can't wait for them to get here. I look forward to finding creative ways to bring my personal style to this cleaner, more controlled format. If I love working within this "system", I bet the next logical progression will be to give the larger Project Life albums a try. 
As soon as I make some progress I'll be sure to share my pages with you guys! 


I adore everything about this Birthday Cake Chandelier DIY. It's so incredibly cute! I showed this pic to Aaron and he liked it…but then when he took a closer look and checked out the DIY, he really really liked! I think the two of us will be making our own very soon. 


The Hello Holiday FW/14 Look Book just launched, and to put it plainly…I love it all!  These Birthday heels are fabulous! I wouldn't mind receiving them for my Birthday next month… hint hint Aar. ; )


I'm very excited about "Big Eyes", directed by Tim Burton, and starring Amy Adams as Margaret Keane. 


I watched the trailer a few times, simply for the eye candy, and I'm impressed with the classic feel of the cinematography. I feel like the subject matter would get overshadowed if the visuals were too over the top. I'm happy to see that Tim went with a more subdued approach. I can't wait to see it! (And yes, I'm on a first name basis with Tim. Aren't you?)

Ok, thanks again for stopping by to check out my Friday Faves. I hope you have a fantastic weekend!
xo, Jenny…and Aaron says hi!


Thursday, 25 September 2014

Fresh from the studio…happy news and happy mail.


Time to Make the Donuts...and the cupcakes, and the macarons, and the cake, and the pizza…and the kitty cats. We've been saying it for years…we feel like a bakery. Of course there's the visual similarities…and then there's the way we work. Batches and batches of handmade goods all lined up...drying as if they're on cooling racks…waiting to be frosted…or varnished…and then the dozens of sweet items are nestled into pink bakery boxes and tied with classic bakers twine.


We try to orchestrate our workday so that all of items get finished in the evening. The following morning we come downstairs to our worktable which is stacked with the pieces we finished the night before, plus bakery boxes, tissue paper, our big jar of taffy, little bags, Thank You stickers, and a couple varieties of shimmery confetti. 
This way, the dirty work has all been completed, and the workday at hand is solely about making everything pretty and presentable. 


Besides all of the "time to make the donuts" days, we've had some other projects we've been chipping away at here and there. We love making use of our sticker sheets any chance we get. In the above project I used some of our "Talk & Thought Bubble" stickers. 
Looking at this pic I had a flashback to last winter. Aaron took one of these sweet gals and stuck her to the faucet to remind us to keep the water trickling so that the pipes wouldn't freeze. But guess what…the pipes froze anyway…a couple of days before we left for our trip to CHA in California.
 Oh geez I am so not ready for Winter. We're actually planning on another California trip for this Winter. Probably for February, or maybe even March. We've been dying to get back out there. We're working on setting up some teaching dates. I'll keep you posted when I learn more specifics. Can't wait!!


You might remember that we had hinted at something fun and exciting that involved our Art Journaling. Well we can let you in on it now…Yep, that's our names on the cover of the Autumn issue of Art Journaling Magazine, which is one of our absolute favorite mags! 
It's always packed with so much eye candy and features so many talented Art Journalers. Every issue is big and thick, and is book quality. We've heard from a few folks that they already have it. So check your local Barnes & Noble, Michaels, etc…it might be on the shelves right now.
I can't wait to get our hands on it! We have a 10 page spread and interview. Say whaaaat?! It's such an honor! 


The other day one of the sweetest packages arrived at our door, and it was totally unexpected. It was from our dear friend Julie…aka Wonder Woman. Julie not only beat cancer…she shared her experience with all of her friends and kept smiling the whole way through. So inspiring. And she's one of the sweetest gals we know…seriously gives the best hugs ever!  There were so many sweet things in this package...incredible homemade jam…lots of gifts…and up above is one of her handmade bracelets. So clever and crazy cute! Made with a vintage tin toy race car, which is even more lightweight than the beads. I love it! 


And while we are talking about cute things…you may already know that we are big big fans and collectors of vintage birthday party ephemera. These little plastic candle holders are not only in the original cardboard packaging…the cellophane is also unbroken. I adore the graphics! That cake is soooo cute.


And we also grabbed these vintage birthday party place cards. They melt my heart with their hand written names. 

Ok, that's it for now…just stopped in for a little hi and hello. Thanks so much for reading!
xo, Jenny…and Aaron says hi and hello as well!  


Tuesday, 23 September 2014

Eat More Cake Art Journal Spread


I find Art Journaling to be such a break from the everyday work. In our "real" work everything has to be so perfect. And I feel like Art Journaling is the opposite of that. It's a chance to be haphazard and messy. It had been a long few days of making, packing & shipping, and while the clear coat on a bunch of die cuts was drying I found some time to play around in one of my Art Journals. This is one of my smaller Moleskine journals and it's nearly filled up. This is one of the basic Molskines with the very thin pages. Prior to doing this spread I had went ahead and bolstered most of the pages with extra layers of paper and paint. Me and Aaron each have several Art Journals and jump back and forth between all of them.


Many times with me, an Art Journal page or spread begins with a vague idea that's related to a certain image or piece of ephemera that I'd like to use. In this case, it was this birthday cake image I had cut out from a piece of vintage wrapping paper. Everything about this image makes me swoon! I just had to use it. So I started the page by painting simple oval shapes in pink and cream, and then pieced in some pink and cream stripe paper. A lot of times when I'm doing a spread, meaning two pages, I like to make the pages mirror each other in some way. Sometimes I do one full composition that spreads across the two pages. But here I wanted it to be two separate pages that fit together perfectly.


Then I did some sketchy colored pencil outlines around the ovals, and added some paint spatters. Like I said…haphazard and messy is what I'm about when it comes to Art Journaling.


Besides the cake, I felt like the spread needed a muse. A face to be the spokesperson. And who better than this little chubby faced doll. I love using my collections in my spreads without actually "using" my collections. I just snapped a pretty close and clear photo of the cutie and printed her out.


I then glued her in with some decoupage medium. And from that same piece of vintage wrapping paper I cut out the corresponding slice of birthday cake and put it in her hand. I didn't want the page to be all pale color, so I then added some bright berry pink polkadots with a dauber, some Sharpie pen doodles, and bit of bright aqua paint details.


I knew I needed washi tape somewhere on the spread. I always need washi tape!


I selected my washi tapes and then pulled out my vintage printers tray full of all my bits and pieces.


Last week I had made these tags using my fave Ashley G stamps. I def wanted to use one of these!


I love how well black compliments pretty pastels. I added some more sketchy details with my Sharpie and also a bunch of stamped flourishes. I remember when flourishes were all the rage. I've got tons! I wish I knew who made these. I don't have the original packaging, and I doubt they make these anymore.


So I taped in my cute girl tag with a bit of metallic gold striped washi. I love how it compliments her gold glittered skirt.


I used some fairly crude handwriting skills to render these letters and cut them out of aqua polk dot paper. I adhered them to the page but then felt that they needed to pop a bit more. So I added a drop shadow with some tan paint, and used my sharpie pen to add "stitching".


I glued in some pink sequins for a bit of shimmer.


And while I was in shimmer mode I figured I'd add some glitter. I keep my most used glitters in this adorable chicken wire wall rack.


I added some ultra fine gold glitter to the candle flames.


Just wanted to share some of my Art Journaling with you guys. I plan on sharing a bunch more…I had been Art Journal all this time but I wasn't taking the time to take in progress photos. I'll try to do this a lot more. And yes…I 100% believe that we should all Eat More Cake.


Not so much that we blow up like a paint and paper filled Art Journal…but you know what I mean. :) I still get a kick out of watching a new moleskine go from the skinny guy on the bottom to the chubby colorful guy on top. 

Thanks for reading! And Happy Art Journaling to you!

xo, Jenny…and Aaron says hi!

Sunday, 21 September 2014

Mixed Media Collage Necklace (using Jewel Pop elements)


Recently our good friends Cathie & Steve sent us some samples of their brand new Jewel Pop Shop collection. Since we love so much of the collection, it wasn't easy to decide what elements to work with first. But right away I guess I was most drawn to the piece you see above. I just love the shape, and knew that I could create something great within that crescent. In our book we have a project called the Sweet Spot Necklace, and in it we use one of Cathie & Steve's Mod Podgeable necklace shapes. I love that particular project and I sorta had something similar in mind for this piece. This one will be assembled in pretty much the same way. The plastic crescent shape is also mod podgeable and we can adhere whatever imagery we want to the back of it with just a little bit of mod podge or other decoupage medium.


For the necklace in our book we used artwork that we had taken from a "Sweet Spot" of an Art Journal page. For this piece I used our Allie & Amy painting as a starting point. This is one of my fave paintings of ours and I'd love to have a wearable version of it. So, I just snapped a pic and then printed it out in a size that would fit the crescent shape.


These are the main elements. The black and white polka dot paper will be the accent pattern, and the pink floral is one of our own hand painted original patterns. I thought it would work as the perfect backdrop for Allie & Amy.


I cut out Allie & Amy, laid them on top of the pink floral paper, and placed the crescent shape over them to figure out the positioning of things.


Using the plastic piece as a template on the pink floral I traced the crescent shape and cut it out. Then positioned Allie & Amy where I wanted them and adhered them with some decoupage medium, and then brushed a top coat over it.


When the top coat dried I then brushed a slight antique wash around Allie & Amy and along the outer edge of the crescent.


I felt like it needed a pop of color, so I mixed up some aqua paint and used a small foam dauber to add some polka dots.


Next I traced black & white polka dot shapes to fit the gold end pieces.


I adhered the collage of Allie & Amy to the plastic crescent using some decoupage medium, adhering them face-up to the back of the crescent so that the plastic acts as a protective shield. When you adhere the paper to the plastic piece you should use a dry piece of paper towel to apply pressure to the back, thus rubbing out any air bubbles. When you look at the image through the plastic it may appear cloudy, but don't worry, it will dry clear. 
And I took a little extra care when adhering the polka dot paper to the gold end pieces. I first sanded the metal to scuff up the surface, and adhered the polka dot paper with Crafty Chica's Extreme Embellishment Glue. Then brushed over it with a topcoat of decoupage medium.


When all of the pieces were dry, I sanded off the excess paper around the edges.


I then used the same black & white polka dot for the back. I just traced and cut out the crescent shape and with decoupage medium I adhered it to the back to finish it off. Then added a top coat for protection. I sanded the excess paper here too.


Once it was dry I poked the holes through with a pushpin, and attached all of the necklace elements with the jump rings. 


I just love how easily it all came together. Maybe the hardest part is selecting your imagery. But once you've got that figured out, the rest is really pretty much cut & paste.


As you can see, I barely even scratched the surface with the Jewel Pop collection. I have so many ideas for future pieces of jewelry. If I find the time to make any, I'll definitely share the process with you guys. And a BIG Congrats to Cathie & Steve on a fabulous collection!

Thanks so much again for checking in! Hope you loved this little necklace project!
xo, Jenny…and Aaron says hi!


Friday, 19 September 2014

Friday Favorites


As I type this, me and Aaron are doing a little baking here at home. Trust me, what we're making is not even in the realm of the wonderment you're seeing above and below. Tonight's baking sesh is simple and basic…nothing fancy…but it's a fave recipe of ours….muffins for two. Yes, the recipe only makes two muffins…baked up adorably in two pink ramekins. 
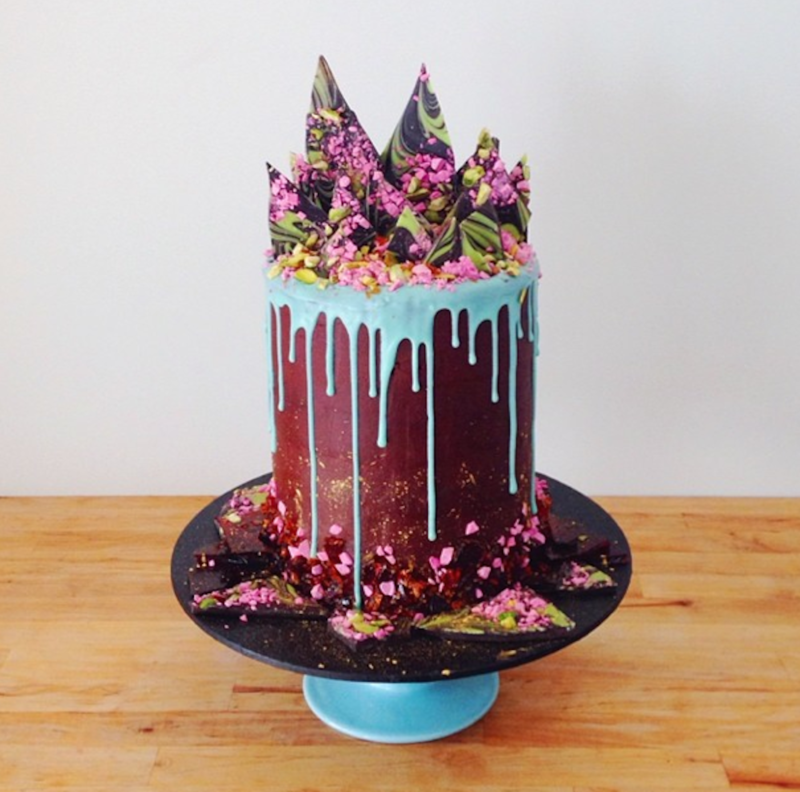
But oh jeeez, forget about our common everyday muffins…let's feast our eyes on the work of  the incredibly talented Katherine Sabbath.


I found her on Instagram, and fell hard for her fantastic whimsical cake designs. And isn't she so cute?


 I'm so into the signature shape of her cakes. I love when someone has a specific vision…a particular way of designing their art. I know I've got my own signature shapes when it comes to painting or art journaling. And Aaron, he's got a certain size canvas that he feels very comfortable painting on. 


It's very apparent that Kat Sabbath's chosen cake shape is a tight, tall cylinder. And her style marries so well to this shape. Just look at how perfectly those drips cascade all the way down to the plate.


Can we rewind the summer just so I can do 4th of July all over again??…only this time I want to have a party with this cake as the honored guest.


I came across these photos of a 4th Birthday party and swooned. As far as themes for Birthdays go, I think Vintage Puppy Party belongs way at the top of the list. This sweets table seriously made my heart flutter! Based simply on these pics, I could totally be friends with these awesome parents. Just look at that backdrop of vintage wallpapers and wrapping papers, hung with framed vintage puppy prints! And having all of those pastel candy colored sweets atop a super rustic table is right up my alley. They even put little part hats on all of the puppy figurines! And seriously…besides having so much style…can you even handle the sheer amount of sweets?!?! That is cake heaven right there.


And then the party table itself…wow! All set and ready for the little party guests. I can't even handle the cuteness! Make sure you click the link above…you have to see the rest of the pics and these pics blown up larger.


For a little while now I'd venture to say that Pinterest and Piñata have become synonymous. Go on and take a short stroll through Pinterest and you will encounter piñata galore…taco piñatas, mini piñatas, donut piñatas…I love that piñatas have made a big come back as a party game and as decor. They are just so much fun and so festive. 
I came across some of my current faves in the piñata universe. For instance…how adorable is this cotton candy piñata?! Ahh! the eyelashes! 


...and this carousel horse! I don't know if I'd be able to whack this gorgeous girl…that's another reason  why the blindfold is required. What little girl could look this beautiful creature in the face and swing a stick at it?!


...and c'mon, this is cute overload…French toast!


Me and Aaron are so grateful and honored to be included among these 9 Great Books on BlogHer! I'm such a big fan of BlogHer, and Jennifer Perkins is an endless source of fabulous blog posts…so many awesome projects, DIY's, makeovers, and how-go's. I love her style, and I'm thrilled that she found inspiration in our book! 


I'm always excited to try new paints and mediums. Aaron and I have some history with milk paint…when we started our career together we were first furniture painters and antique furniture restorers, so we were using milk paint over 20 years ago. When I saw this new collection, Milk paint from Imaginisce, I got super excited! 
There aren't a ton of colors, but they've got the classics. I'd really love to get my hands on some of these! And I love that I found them on Scrapbook.com


And while we are talking paint…I'd love to work with this set of patterned brayers! They're a perfect tool for art journaling, and mixed media canvases. So much of the artwork that me and Aaron make is rendered in a fairly traditional style. But when we create for ourselves and our only focus is to have fun, we work much more freely with the paint. Sometimes with paint you have to think outside the brush. You almost have to think of paint in an entirely different way…imagine that you're sculpting with it. And brayers like these are awesome for that type of thing.

Ok, thanks so much again for checking out my Friday Faves! I hope you have a wonderful weekend! 
xo, Jenny…and Aaron says hi!